March is national craft month, oh my! So I thought it’d only be appropriate to start posting the craft projects and ideas I’ve been working on… this one in particular is going to be my entry for the Dollar Store Craft Competition.

The idea came out of necessity… my mom’s Garden Club was hosting an event where everyone brought a potted plant to use as the decor (an ingenious idea itself, cuts the decorating budget to almost zilch) . Anyways, I wanted a name tag for my plant, so people would know it was mine and not “accidentally” take it home… I ended up making a personalized mini-garden sign for everyone, and extras with a cute gardening quote to use as favors to take home. They were a hit! And cost next to nothing to make (thanks to the abundance of sticks in out back yard). Here are the steps to create some, if you like 🙂
Mini Garden Signs
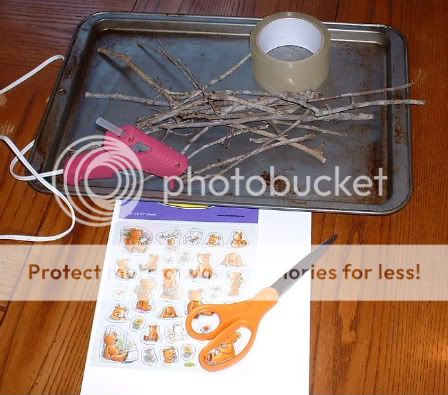
What you need:
Mini Glue Gun![]() and Glue Sticks
and Glue Sticks
Clear Packing Tape OR Contact Paper
Small Garden Themed Stickers
Scissors
Index Cards or Pieces of Blank cardstock
Computer and Printer
Sticks about 6" long*
Heatproof work surface
*Please do not break sticks off of live trees. If you do not have trees in your
yard, try looking on the ground at a local park or around your neighborhood.
How To:
Begin by printing your choice of garden/flower quotes and sayings onto cardstock. I typically divide the page into 3 columns and type the message with 18-20 point font. The quote should make a 1-1.5" square or
rectangle. (Exact measurements aren’t necessary, just keep it small).
Plug in your hot glue gun to let it warm up while you make the cards for your signs.

Take your garden stickers and place it as close to the words as you can. Trim straight edges around the wording and stickers, leaving about 1/8" margin. This final square should be about 1.5"-2" on each side.
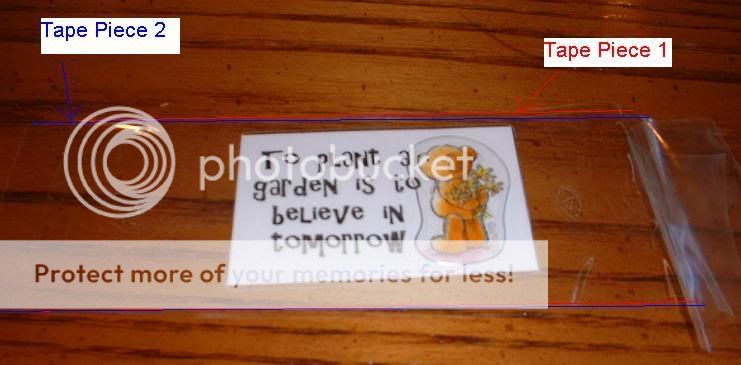
If you are using packing tape, cut off a piece and place STICKY SIDE UP on the table (Piece 1).

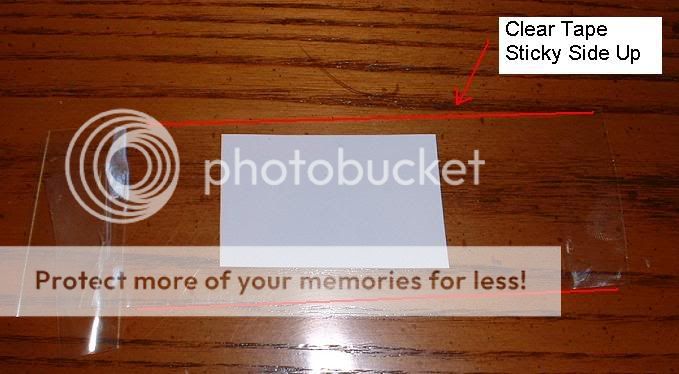
Lay each card face down on the tape smoothly, centered between the top on the bottom. You can lay several cards down at once if you cut a long piece of tape, just be sure to leave about 1/2" between them. Take a second piece
(Piece 2) of tape the same size as the first and lay STICKY SIDE DOWN on top piece 1+cards. Smooth out the bubbles by placing a finger tip on the middle of the card and pushing out towards the end of the tape. The card is now laminated and protected!
Using contact paper is recommended if you are making a lot of signs at once. Follow the same instructions so the sticky sides are together with the card in the middle.
 Trim the tape around each card, leaving a slight border so none of the cardstock is
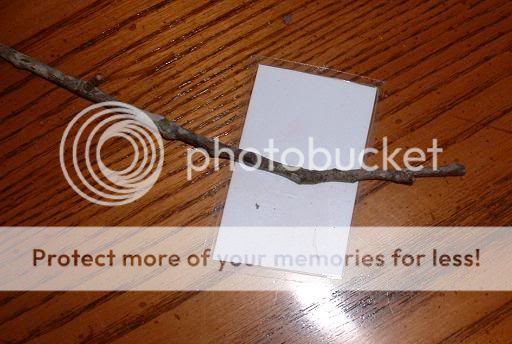
exposed. Starting about 1" from the top of your stick, place a small line of hot glue down the front of the stick… it only needs to be as long as your card. Quickly stick the back side of one of your cards to the hot glue,
and hold for about 30 seconds. Set aside and let the sign cool completely before you stick it in your potted plant.
Using a variety of different fonts, stickers and sticks makes every sign look unique!
Variations
- Type different messages for different occasions, use funny quotes, or personalize your signs (Get Well Soon, Happy
Birthday, Mom’s Garden, "I need water") - Stick some in your silk plants saying “Master Gardner” 😀
- Hand write a short note instead of typing it for a personalized touch
- Use Mini Signs when giving plants as gifts
- Make mini signs to remind you what type of flower you planted

Cute and simple, hope you like it!

AWEsome Idea!!! I have several plants in pots and they needed an extra something. I’ve been collecting gardening quotes and didn’t know what to do with them. Your idea is easy and very versatile for other occasions too. Good job. Thanks.
Those are cute!! Great idea!