![]() Here is a fun and easy craft you should try! The following instructions are for a pet sized Fleece Blanket… they are attractive & keep pet hair off your sofa. You can make them in human size too 😉
Here is a fun and easy craft you should try! The following instructions are for a pet sized Fleece Blanket… they are attractive & keep pet hair off your sofa. You can make them in human size too 😉
*It is usually easy to find fleece on sale at a fabric store… one really good sale last November got me enough to make 4 different blankets for Maya the Dog for Christmas!
No Sew Blanket
What you need:
1 1/4 Yards of Fleece*
A sharp pair of scissors![]()
Acrylic ruler![]() (or a yardstick)
(or a yardstick)
5" square of lightweight cardboard (like a cracker box)
*The following directions are for a pet blanket
Other options below
Begin by cutting the selvage off of your piece of fleece. This is the edge (about 1/4" of fabric) where the image stops, and sometimes there is lettering or colored dots. You now should have a piece of fleece 45"x52" (size may vary slightly depending on the width of the fleece you purchased).
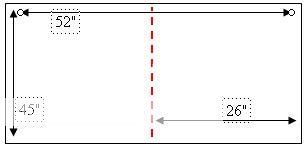
Fold your fleece in half, with the wrong sides (ugly, usually faded looking) of the fleece together (red dotted line above). You should now have a rectangle about 45"x26". If the sides dont match up perfectly, thats ok! You wont be able to tell in the end. Make the fold as even as you can.
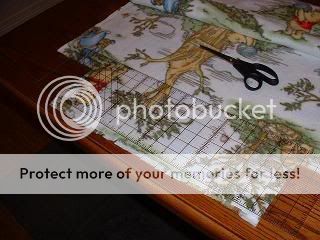 Decide which side of the fleece you want to start on. I suggest you choose and open side first (not the fold). Use your cardboard square as a guide to cut a 5" square from the two corners. Be sure to cut through both pieces of the fabric.
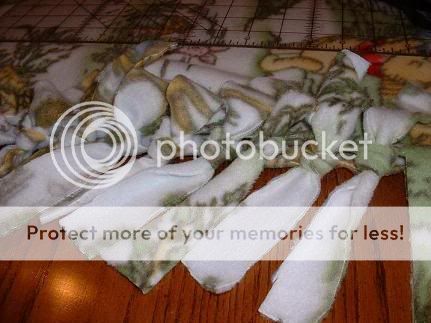
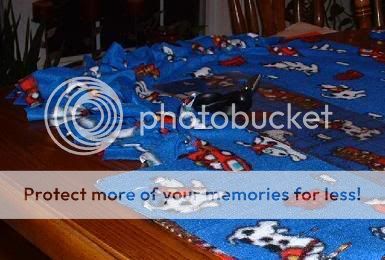
Lay your acrylic ruler about 1/2" above the edge of the fleece (as shown on white fleece). Make notches in the fleece 1 1/4" apart (1 1/4" mark, 2 1/2" mark, 3 3/4" mark, 5" mark…) until you have cut notches in the entire side. You space between your last notch and the edge of the square may be a little larger/smaller than 1 1/4". That’s ok!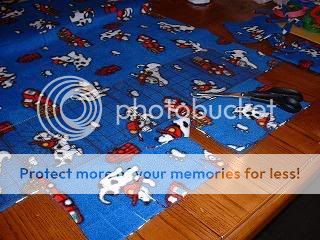
Without shifting the ruler left of right, move it straight up in line with the top of the square. Starting with the first notch, cut straight up towards the 1 1/4" mark on the ruler. This technique helps insure your cuts are straight and your strips will be even. (See blue fleece) Make sure you are cutting through both pieces of fabricDo not
cut past the end of the 5" square. For the 2nd notch, cut towards the 2
1/2" mark on the ruler. Continue along the edge until you have all of the
notches/strips cut. It is ok if the lines aren’t completely straight, as
long as all strips are about the same thickness. You should now have a
line of double thickness strips. Time to tie some square knots.
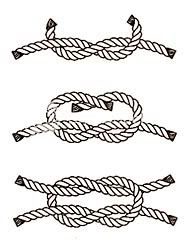
What is a SQUARE KNOT?
 Ask any Scout and tell you that a square
knot is a knot used to join two lines of similar size. That is just what we need here. For each strip, there is an equal size top piece and bottom piece that needs to be joined together. If you can tie your shoes, you can tie a square knot. Just remember "Right Over Left, Left Over Right."
Using the 1st set of strips, take the top piece in your left hand and the bottom piece in your right hand. Take the piece in your right hand and bring it over the piece in your left hand and wrap it under (like tying your shoe). Pull until you reach the edge of the strip.
Pulling any further will cause the fleece to buckel and you will not have a smooth blanket. Now, take the piece in your left hand (the one that you just pulled under) and bring it over the right hand piece, and pull under.
When you tie the square knot correctly, it should lie flat. A uniform knot all the way around your blanket will make it look amazing!
When you reach the end of the row, turn your blanket clockwise and repeat these steps on the next side. I strongly suggest that you cut and tie one side at a time. If you try to do all of the cutting first, then all of the tying, it never fails that the pieces wont line up right and you tie the wrong pieces together. If you are at the edge that has the fold, smooth the fleece flat and cut along the fold. I do not do this in the beginning because the fold in the fleece helps keeps the 2 sides together.
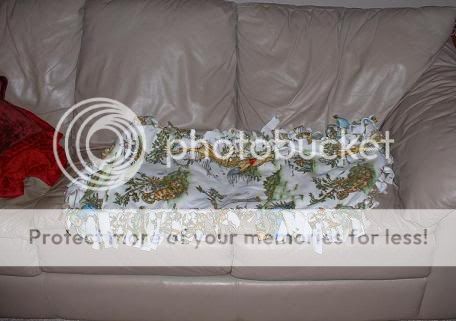 After what seems like an eternity of cutting and tying, you will end up with a lovely, cozy little blanket for your pet. It is just the right size to lay on the seat of your couch (or over the top)… wherever your pet likes to sit. It saves your furniture from claw marks and animal hair. When company comes, just fold them up and stash them away! These blankets are machine washable
too.
-Make a reversible blanket: use a different
fleece fabric for the front and the back of the blanket.
-Make a pet bed: Before tying the last
row of strips, slip and old pillow in between the top and bottom layer.
-Make a human sized blanket: Decide you large a blanket you want to make. Take these dimensions, and add 10" to the width and 10" to the length (for the 5" strips on each side). Remember, most fleeces come in 52" widths, so this would give you a blanket 42" wide. Follow the instructions above, just with a lot more cutting and tying!


Leave a Reply